Table of contents:
Video editing basics: Essential techniques
Familiarize yourself with your editor layout
Create your narrative: Cuts, transitions and b-roll
Edit audio and add sound effects
How to edit a video online with Riverside
How to edit a video on a Windows PC with Clipchamp
How to edit videos on Mac with iMovie
How to edit a video on Android or iPhone with CapCut
How to edit a video for social media
5 Beginner tips for editing videos
Key takeaways:
- Basic editing techniques include trimming, cutting, and adding transitions, titles, and text.
- To improve your editing skills, watch tutorials, learn keyboard shortcuts, and continue to practice.
- Riverside is an excellent beginner editing platform with AI features that streamline your workflow.
Are you completely new to video editing and don’t know where to start? Is this holding you back from showcasing your creativity to the world?
Don't worry; we've got you covered.
In this quick guide, we'll introduce you to essential video editing techniques and show you how to use edit on some of the most popular platforms.
Let’s get into it.
Video editing basics: Essential techniques
Let’s look at how to go about editing your first video. We’ll explain all the essential techniques you will use in the process.
Importing your video
No matter what video editing software you choose, you’ll need to start by importing your project.
Open your video editor and create a new project.
After the new project is opened, find the “Import” button. This lets you add media that’ll be used in the video.
Make sure that the video you’re importing is in a compatible format to your editor. For example most editors can work with MP4 or MOV files.
Syncing your audio and video
If you’re uploading video and audio from separate recording devices then you may need to sync your audio and video.
Syncing works best if you capture a loud clap in the beginning of your recording. The loud clap is easily recognizable, making it easier to match your audio and video.
(This is actually one reason why filmmakers use clappers.)
Many video editors come with an automatic tool that can then sync your audio and video. Alternatively, you can use the sound waves and the visual of the clapper to do so.
Familiarize yourself with your editor layout
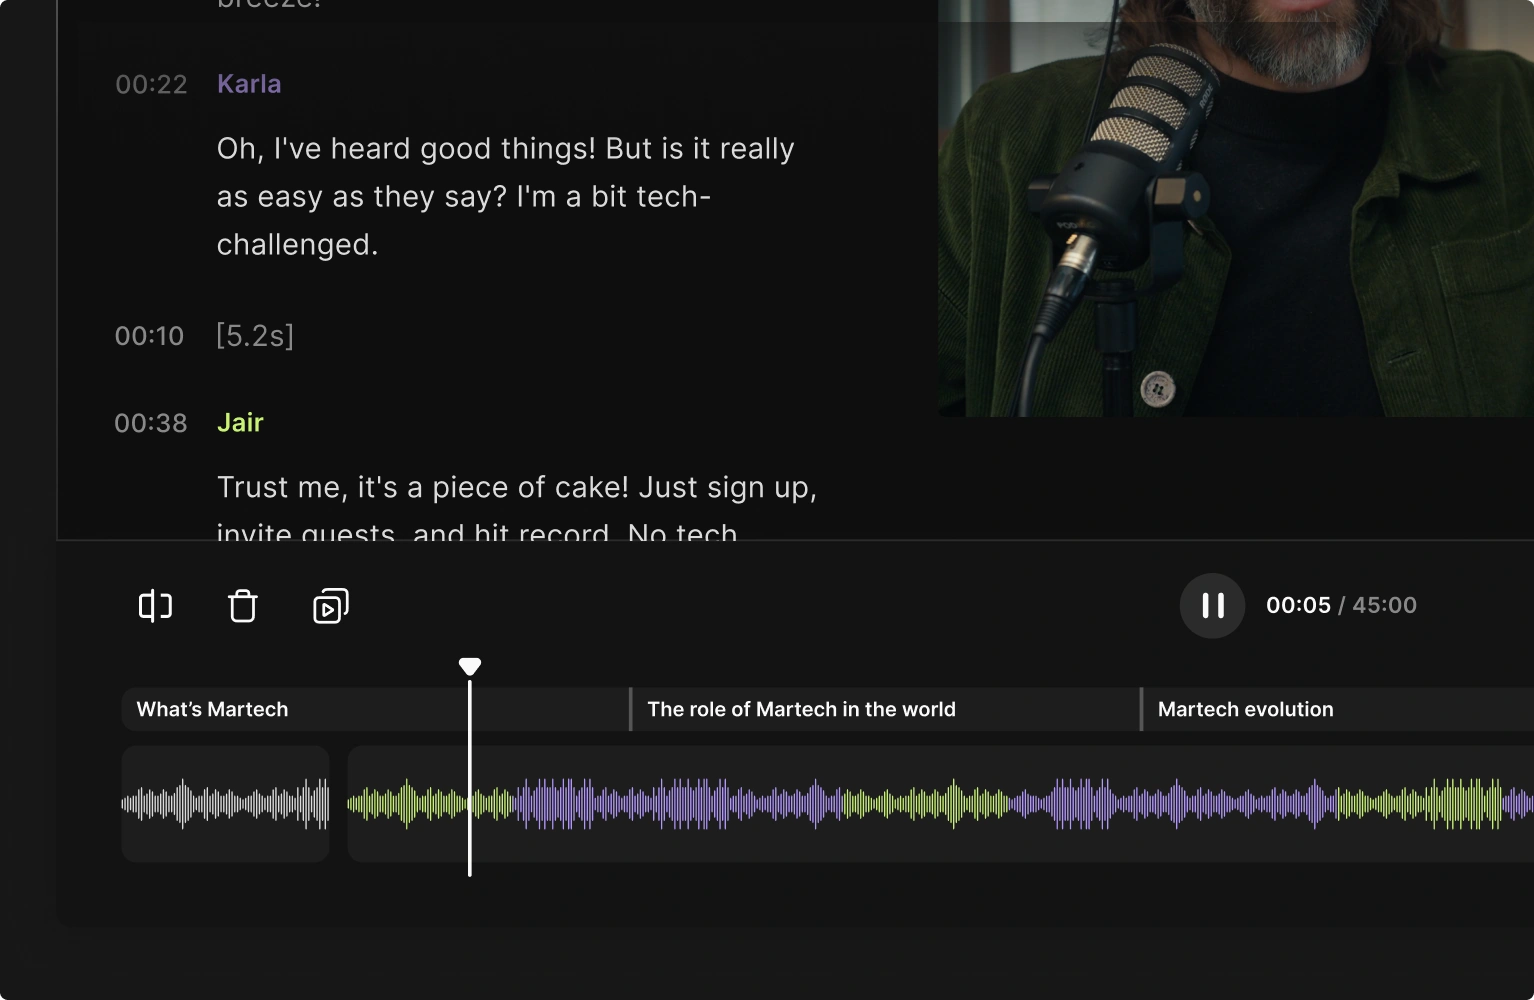
Most editors use a timeline view. The timeline is where you piece together your story, dragging and dropping clips into the perfect sequence to craft a compelling narrative.
To move around your timeline, you'll use the playhead tool. It's like a cursor that helps you jump to specific moments or preview your edits.
Some software might offer you other ways to edit videos. For example, text-based editing has become popular with the rise of AI.
In this case, AI converts your video into a live recording transcript that you can edit to make changes to your live recording. If you delete text in your transcript the corresponding sections in your recording will cut from your video.
.webp)
Trim out unnecessary parts
To remove unnecessary portions of a video, use trimming and splitting tools.
Trimming
Trimming involves shortening the beginning or end of a clip to remove unnecessary parts. It helps the video maintain a tight narrative by focusing on the most important parts of the footage.
On a video editing timeline, you can usually “trim” a clip by dragging the edges of it to shorten it.
Splitting
Splitting is when you cut one clip into two or more parts. You can do this to cut out sections in the middle of a single recording.
To “split” a clip, position the playhead to the location where you want to make the cut, and then use the “Split” or “Razor” tool (usually indicated by a scissor or razor icon).
Create your narrative: Cuts, transitions and b-roll
Cuts
A "cut" in video editing is a fundamental transition technique where one shot ends, and another begins without any additional effects or transitions.
For example, if there’s a movie scene where the camera is currently focused on one character’s face, after a “cut” the camera will next focus on the other character in the scene.
There are different types of cuts like:
- Jump cut where there is abrupt cut from one scene to another.
- L-cut where the audio of the current scene remains while the visuals of the next scene appear.
- J-cut where the audio from the next scene starts before the video appears.
To create a cut:
- Use the “split” or “razor” tool to split the clip at the designated cut point.
- Drag the remaining clips together so there are no gaps between them.
The point where the two clips meet is the standard cut.
If you’d like to try a J or L cut, you’ll need to work on a separate track video editor. In this way you can make cuts to your audio track and move them around without moving the video in the same way.
You’ll also find that transitions and b-roll can help create more interesting cuts:
Transitions
Transitions are visual effects that bridge two clips together.
How does a cut differ from transitions? Well, a cut is the most basic kind of transition. However, unlike transitions, it doesn’t have any special effects.
To add a transition, look for a transition panel or library in your software. Then drag a transition between two clips on your timeline.
For example, a fade in transition, will have the next clip appear slowly on your screen. A fade out transition will have the current scene disappear slowly into a black screen or the next scene.
B-roll
B-roll is any video footage that is secondary to the main subject or action in a video. A-roll is the primary footage that tells us the main story.
Besides creating smoother cuts and transitions, b-roll often adds more context to a video.
Imagine there’s a documentary about a chef opening a new restaurant.
The A-roll might consist of interviews with the chef discussing her vision, the challenges she faced, and the excitement of the opening day.
The B-roll could include footage of the chef chopping vegetables, the restaurant's lively atmosphere, or close-up shots of delicious food being prepared and served.
To add a B-roll, create a new video track above your main footage on the timeline, and then drag and drop your B-roll clips onto the new track. Make sure to switch off the audio of the b-roll track so your main audio plays.
Edit audio and add sound effects
Most editing software have separate tracks for video and audio. In some cases you can even split the two.
When it comes to editing audio, the basics include:
Removing background noise
In most cases you can use an automated background noise remover.
If your video editing software doesn’t have a background remover, then you can try use a free one online.
That said, if there’s particularly problematic background noise then you may need more advanced editing tools.
Audio mixing
Besides removing background noise you may also want to:
- Adjust your audio volumes so they stay in a specific range.
- Get rid of pops or hissing sounds from your mic.
- Add audio transitions for a smoother flow.
Sound effects and music
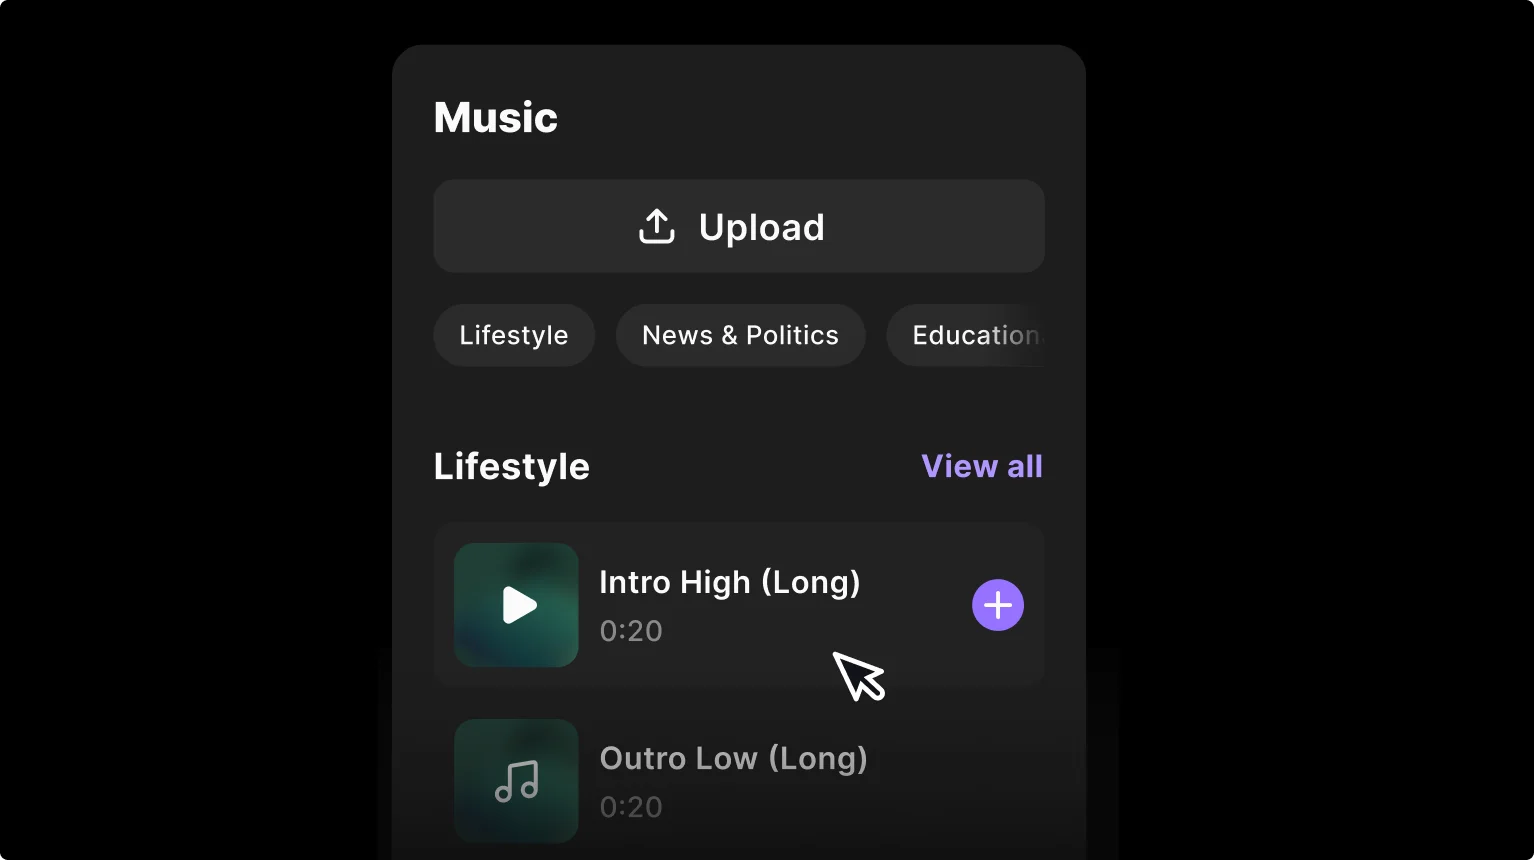
For the final touch, add music or sound effects onto your audio timeline.
Some video editing software have their own preset audio library. In other cases you may need to upload your own. Just make sure to abide by copyright laws of whatever music or audio you use.
Learn more and check out our guide on how to edit video audio.
Customize your visuals
Think filters, overlays and textual additions when it comes to customizing your video.
Filters and color correction
Filters are visual layers that create artistic effects. An example of a filter is a beauty mode filter that evens out skin tone and improves skin coloring.
To add a filter, look for a “Filters” or “Effects” panel in your editing software. Browse through the available options to find ones that’ll add the appropriate creative flair to your footage. Drag and drop the chosen filter onto a clip in your timeline.
Advanced video editors might also use color grading and correction. Color correction is when you alter the colors of your video so they look consistently natural. On the other hand, color grading is altering colors to achieve a desired mood or tone.
Adding captions, text, and titles
To finish off, we suggest you use captions, titles, and titles to add additional context.
Captions and subtitles
Instead of spending hours typing your own captions, use an automated captioning or transcription tool. Many video editors have this built in. This turns your recording into a transcript that you can add as customizable captions or download into a text format.
In this way, you can either add open or closed captions to your video.
Open captions are burnt into your video and cannot be toggled off. You can style and position them as you like.
Closed captions are added as a file to your video and can be toggled on and off. You’ll need to download a subtitle-formatted file of your transcript, like an SRT file, to do this.
Text and titles
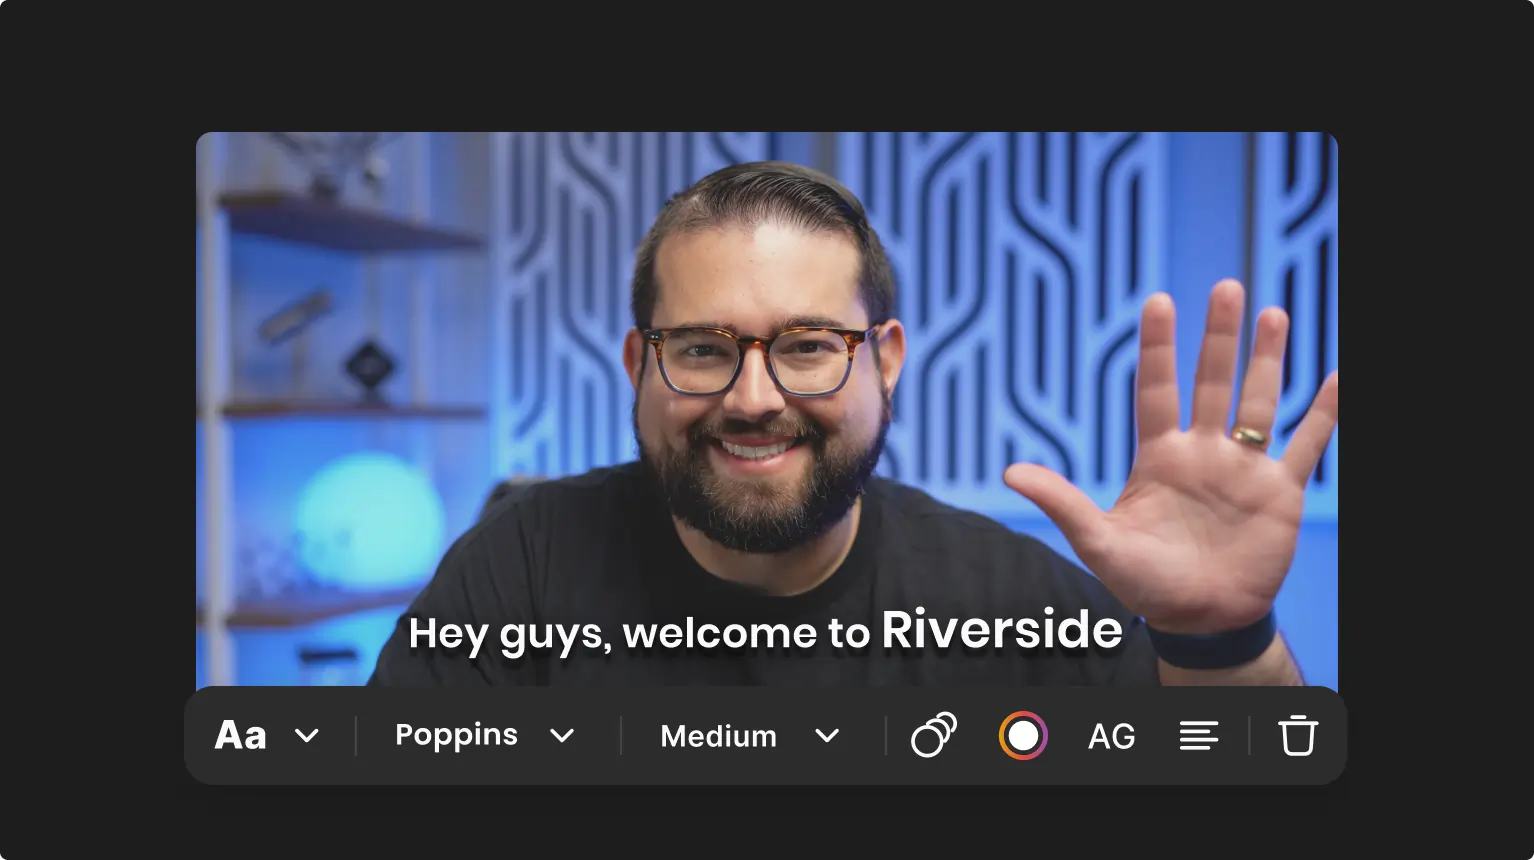
Most video editing apps let you add text or titles to your videos. You can create a title card at the beginning of each section, add lower-third graphics to identify people, or just use text to highlight key points.
Make sure to choose fonts that are easy to read and match the mood of your video.
Review and Fine-tune
Watch your entire video from start to finish. Make any adjustments if necessary.
Export your video
Look for an “Export” or “Share” button. Choose your export settings (format, resolution, frame rate, quality)
Click “Export” or “Render” and wait for your video to process.
If you'd like to learn more tips on video editing you can check out the video below:
How to edit a video online with Riverside
Editing a video with Riverside is easy, intuitive, and fast. Very fast.
This is because Riverside has many tools to drastically reduce editing time. These include the intuitive timeline editor and Ai tools like Some of these tools include You can use our intuitive timeline editor, or take advantage of our AI tools like:
- Text based editing where trimming your video is as easy as deleting text.
- A clip creator that turns one long recording into multiple shareable short videos.
- Automated audio enhancement that removes background noise and smooths out your audio.
- Captioning at the click of a button.
And, more. You can learn more about Riverside, or sign up to start editing videos easily.
Here are the step-by-step instructions to do so:
Step 1: Log in to Riverside on your desktop browser, create a new studio, and record your video. We have created a video tutorial for this to help guide you better.
Step 2: After recording the video, click on the video recording. Then on the following page, click the purple “Edit” on the top right-hand side and then click “Create new edit.” You should now be inside Riverside’s editor workspace.
Step 3: There are multiple ways to trim and cut your video.
One way to edit is by editing the transcript. Deleting words on the transcript, available on the left side of the editing workspace, deletes the corresponding section of the video.
You can also use the timeline editor. To split the video, move the play head to the section where you want to split it, and then press the “Split” button on the left-hand side above the timeline. After splitting, you can delete the unwanted portions of the video or move footage around to create a narrative.
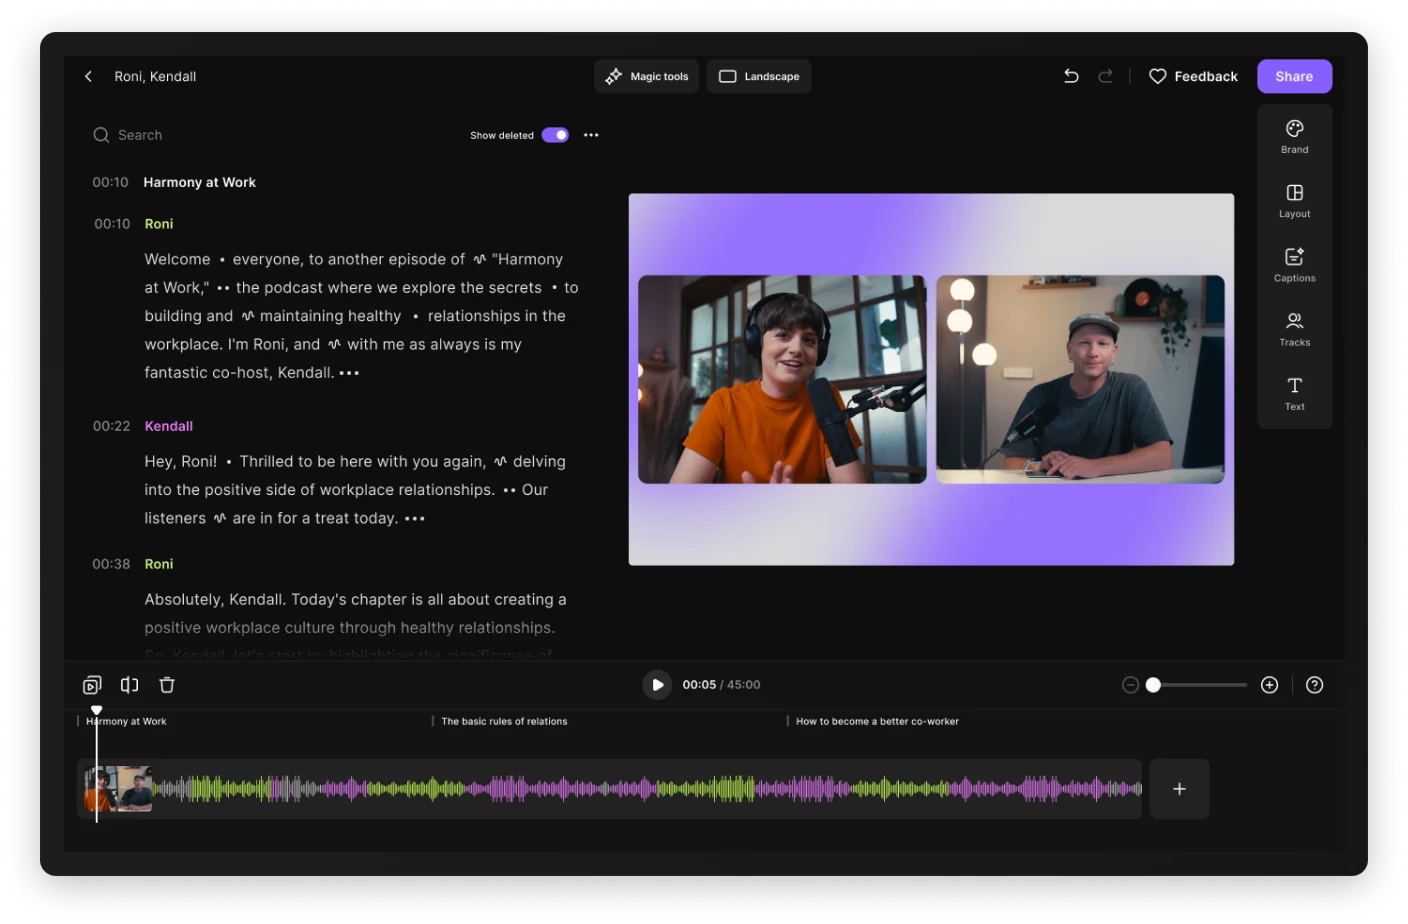
To trim the video, move your mouse to the edges of the clip. Then, drag the edges to your desired start and end point.
Riverside also has a multitrack recorder that lets you add music and sound effects to various clips in your timeline.
Step 4: On the right side of the workspace, there are options to add “Text” and “Images” These are stock images but you can upload your own media.
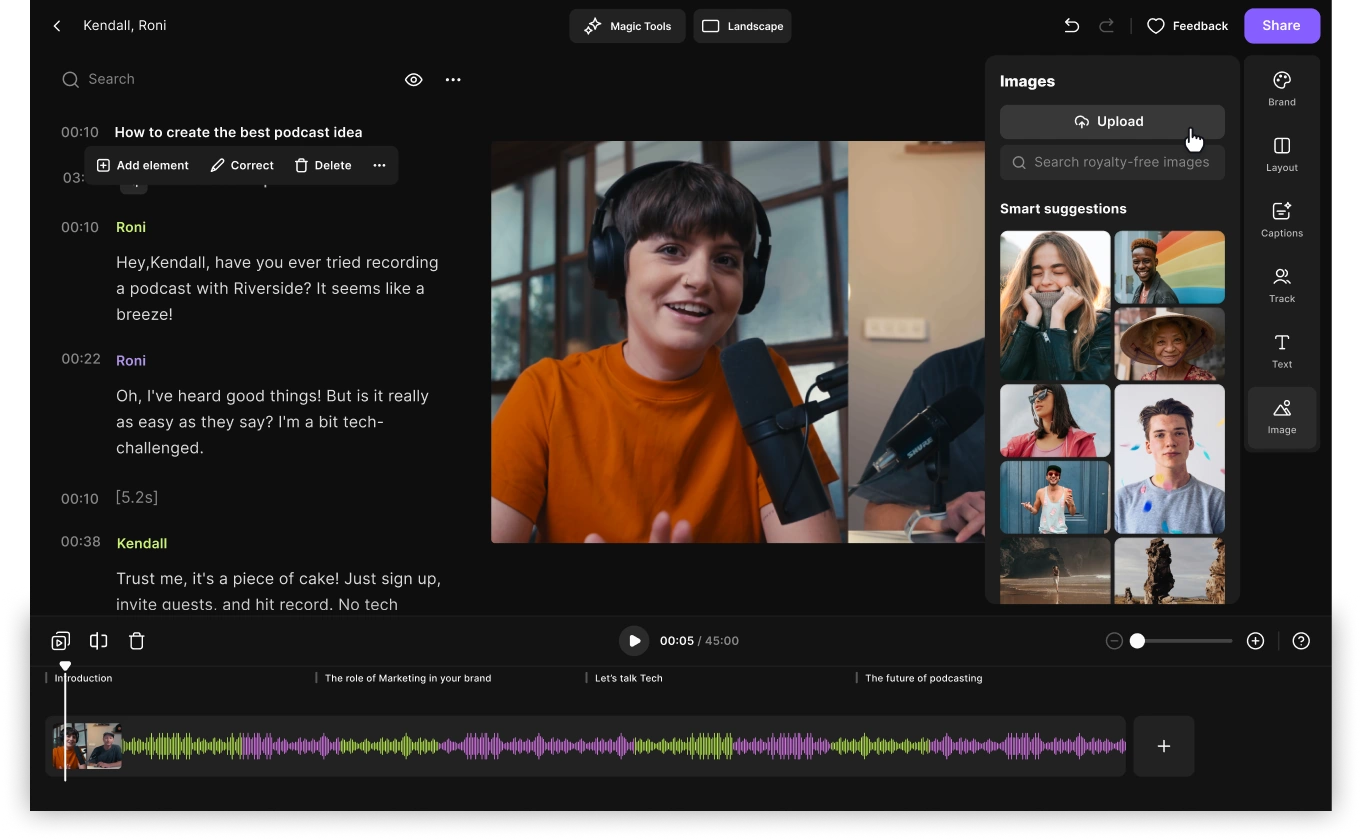
To add images, video, and audio from your desktop, click on “Uploads”, choose the desired tab, and then click on “Upload.”
Step 5: You can change the background and logo by clicking on “Brand,” and then uploading the logo or background using the “+” icon.
Step 6: You can also choose between various “Layouts” like full-screen, picture-in-picture, split-screen, and more.
.webp)
Step 8: Click on “Magic Tools” for options to remove pauses, filler words, unwanted sounds, or to enhance the audio.
Step 9: The button to the right of “Magic Tools” lets you change the aspect ratio of your video.
Step 10: After making all the changes, tap on “Export” on the right-hand side. Choose your desired settings, then click on the purple “Export video” button.
How to edit a video on a Windows PC with Clipchamp
Clipchamp comes pre-installed on Windows 11 PCs. It’s an easy-to-use editor that’ll have you video editing in no time. Here’s a breakdown of how to edit using Clipchamp:
Step 1: Fire up Clipchamp on your Windows desktop. Click on “Create a new video” to edit your video.
Step 2: To add your video, click “Import Media.” Alternatively, you can drag and drop the media from your device to import. You can also record your own video by going to the “Record & create” tab.

Step 3: Once you’ve added your video, navigate to it, hover your mouse on the video, and click the green “+” button to add it to the timeline. Or you can drag and drop the video.
Step 4: To trim a video, move your mouse to either end of the video and drag the green bars.
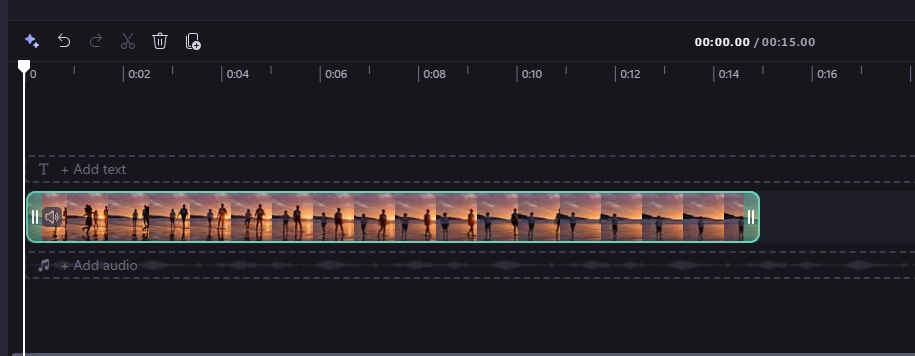
Step 5: To split a clip, click on the clip, then move the white playhead to the section from which you want to cut the clip. Then click “S” on your keyboard or click on the scissor icon on the editing toolbar.
Step 6: To delete a section, click on the part you want deleted. Then either click on the trash icon or hit “Delete” on your keyboard.
Step 7: To crop, rotate, flip, or get a picture-in-picture effect, click on the video at the top. A floating toolbar will pop up that has all these options.

Step 8: You can adjust colors and speed - and add filters, effects, and fade - by navigating to the property panel, located on the right side of the workspace.
Step 9: On the left side, you’ll find options to add text, transitions, audio, stickers, and sound. Just go to the media you want to add and click the “+” button on any of them.
Step 10: To export your video, click on “Export” in the top, right-hand corner and choose the resolution.
How to edit videos on Mac with iMovie
iMovie is popularly used by Apple fans worldwide for their editing projects. Here’s how to use it:
Step 1: Start iMovie and click on “Create New” under Projects. Then select “Movie.”
Step 2: To import your video, click “Import Media” and upload your file(s). You can access these files wherever you need them under the “My Media” tab.
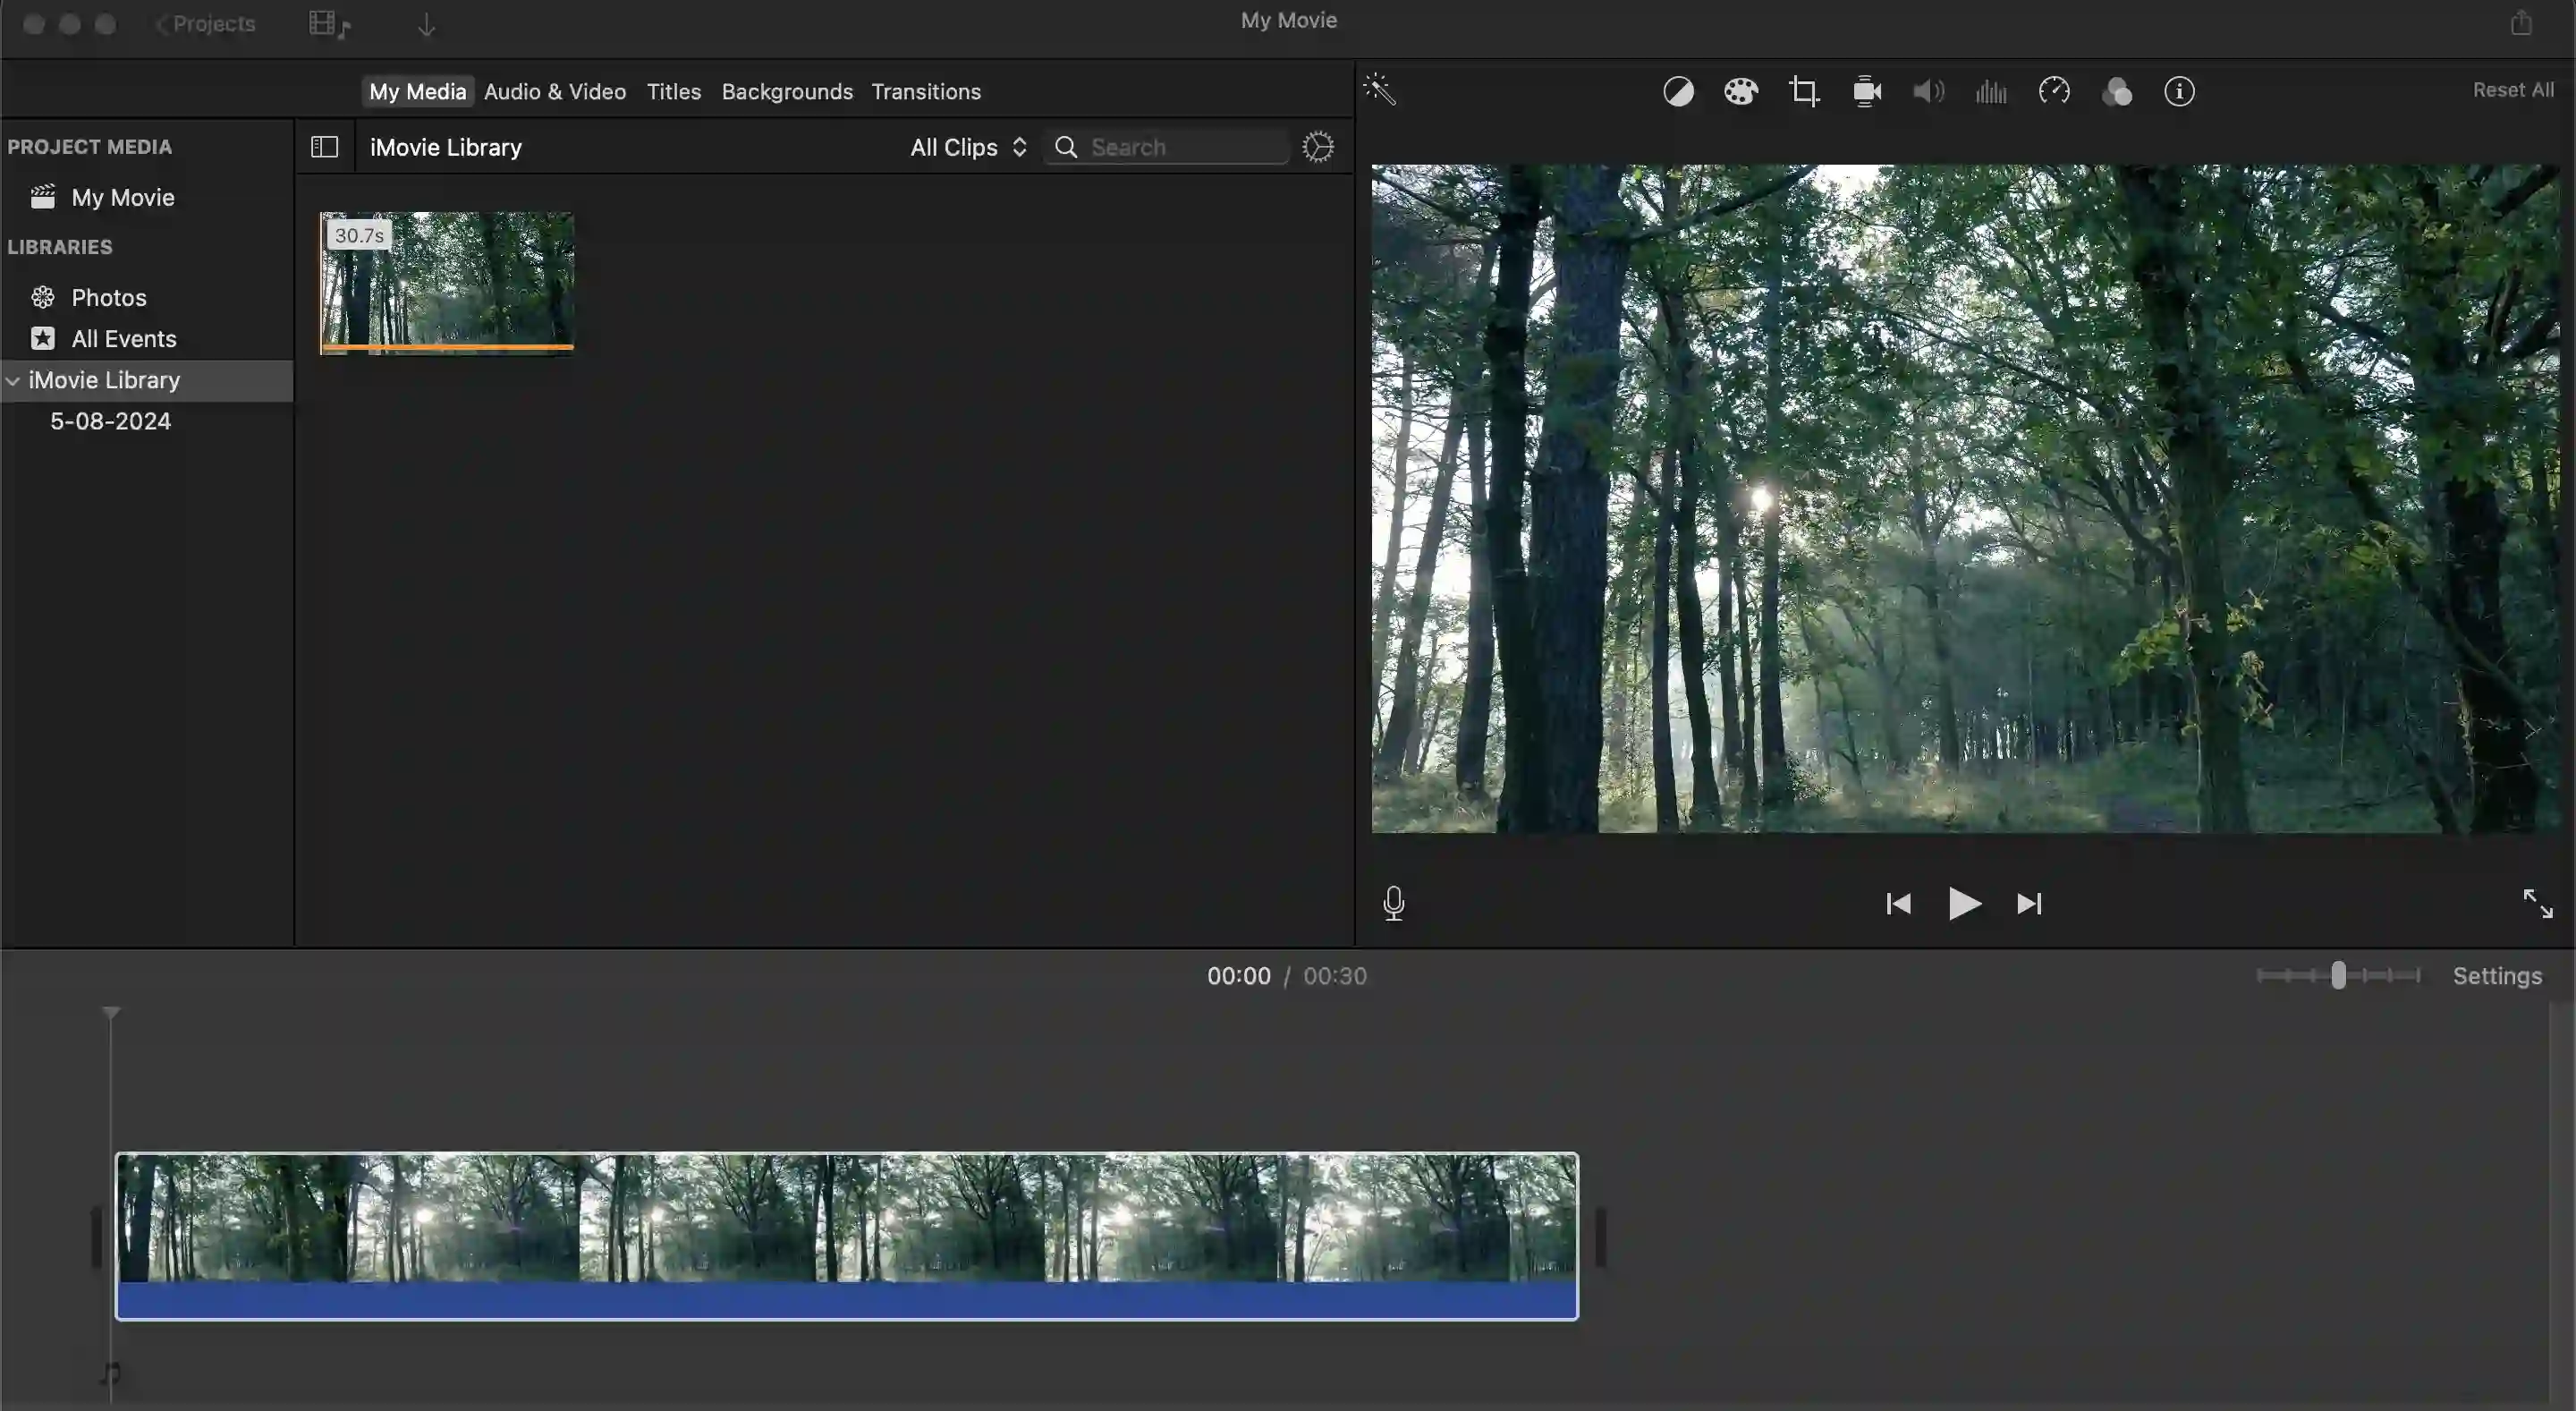
Step 3: Drag the first clip you want to add to the timeline below.
Step 4: To split a clip, you move the play head to the portion of the video you’d like to split can and then use “Cmd+B.” If a portion is unwanted you can hit “Delete” on the keyboard.
Step 5: To trim a clip, move the cursor to the start or end of the clip, and drag it.
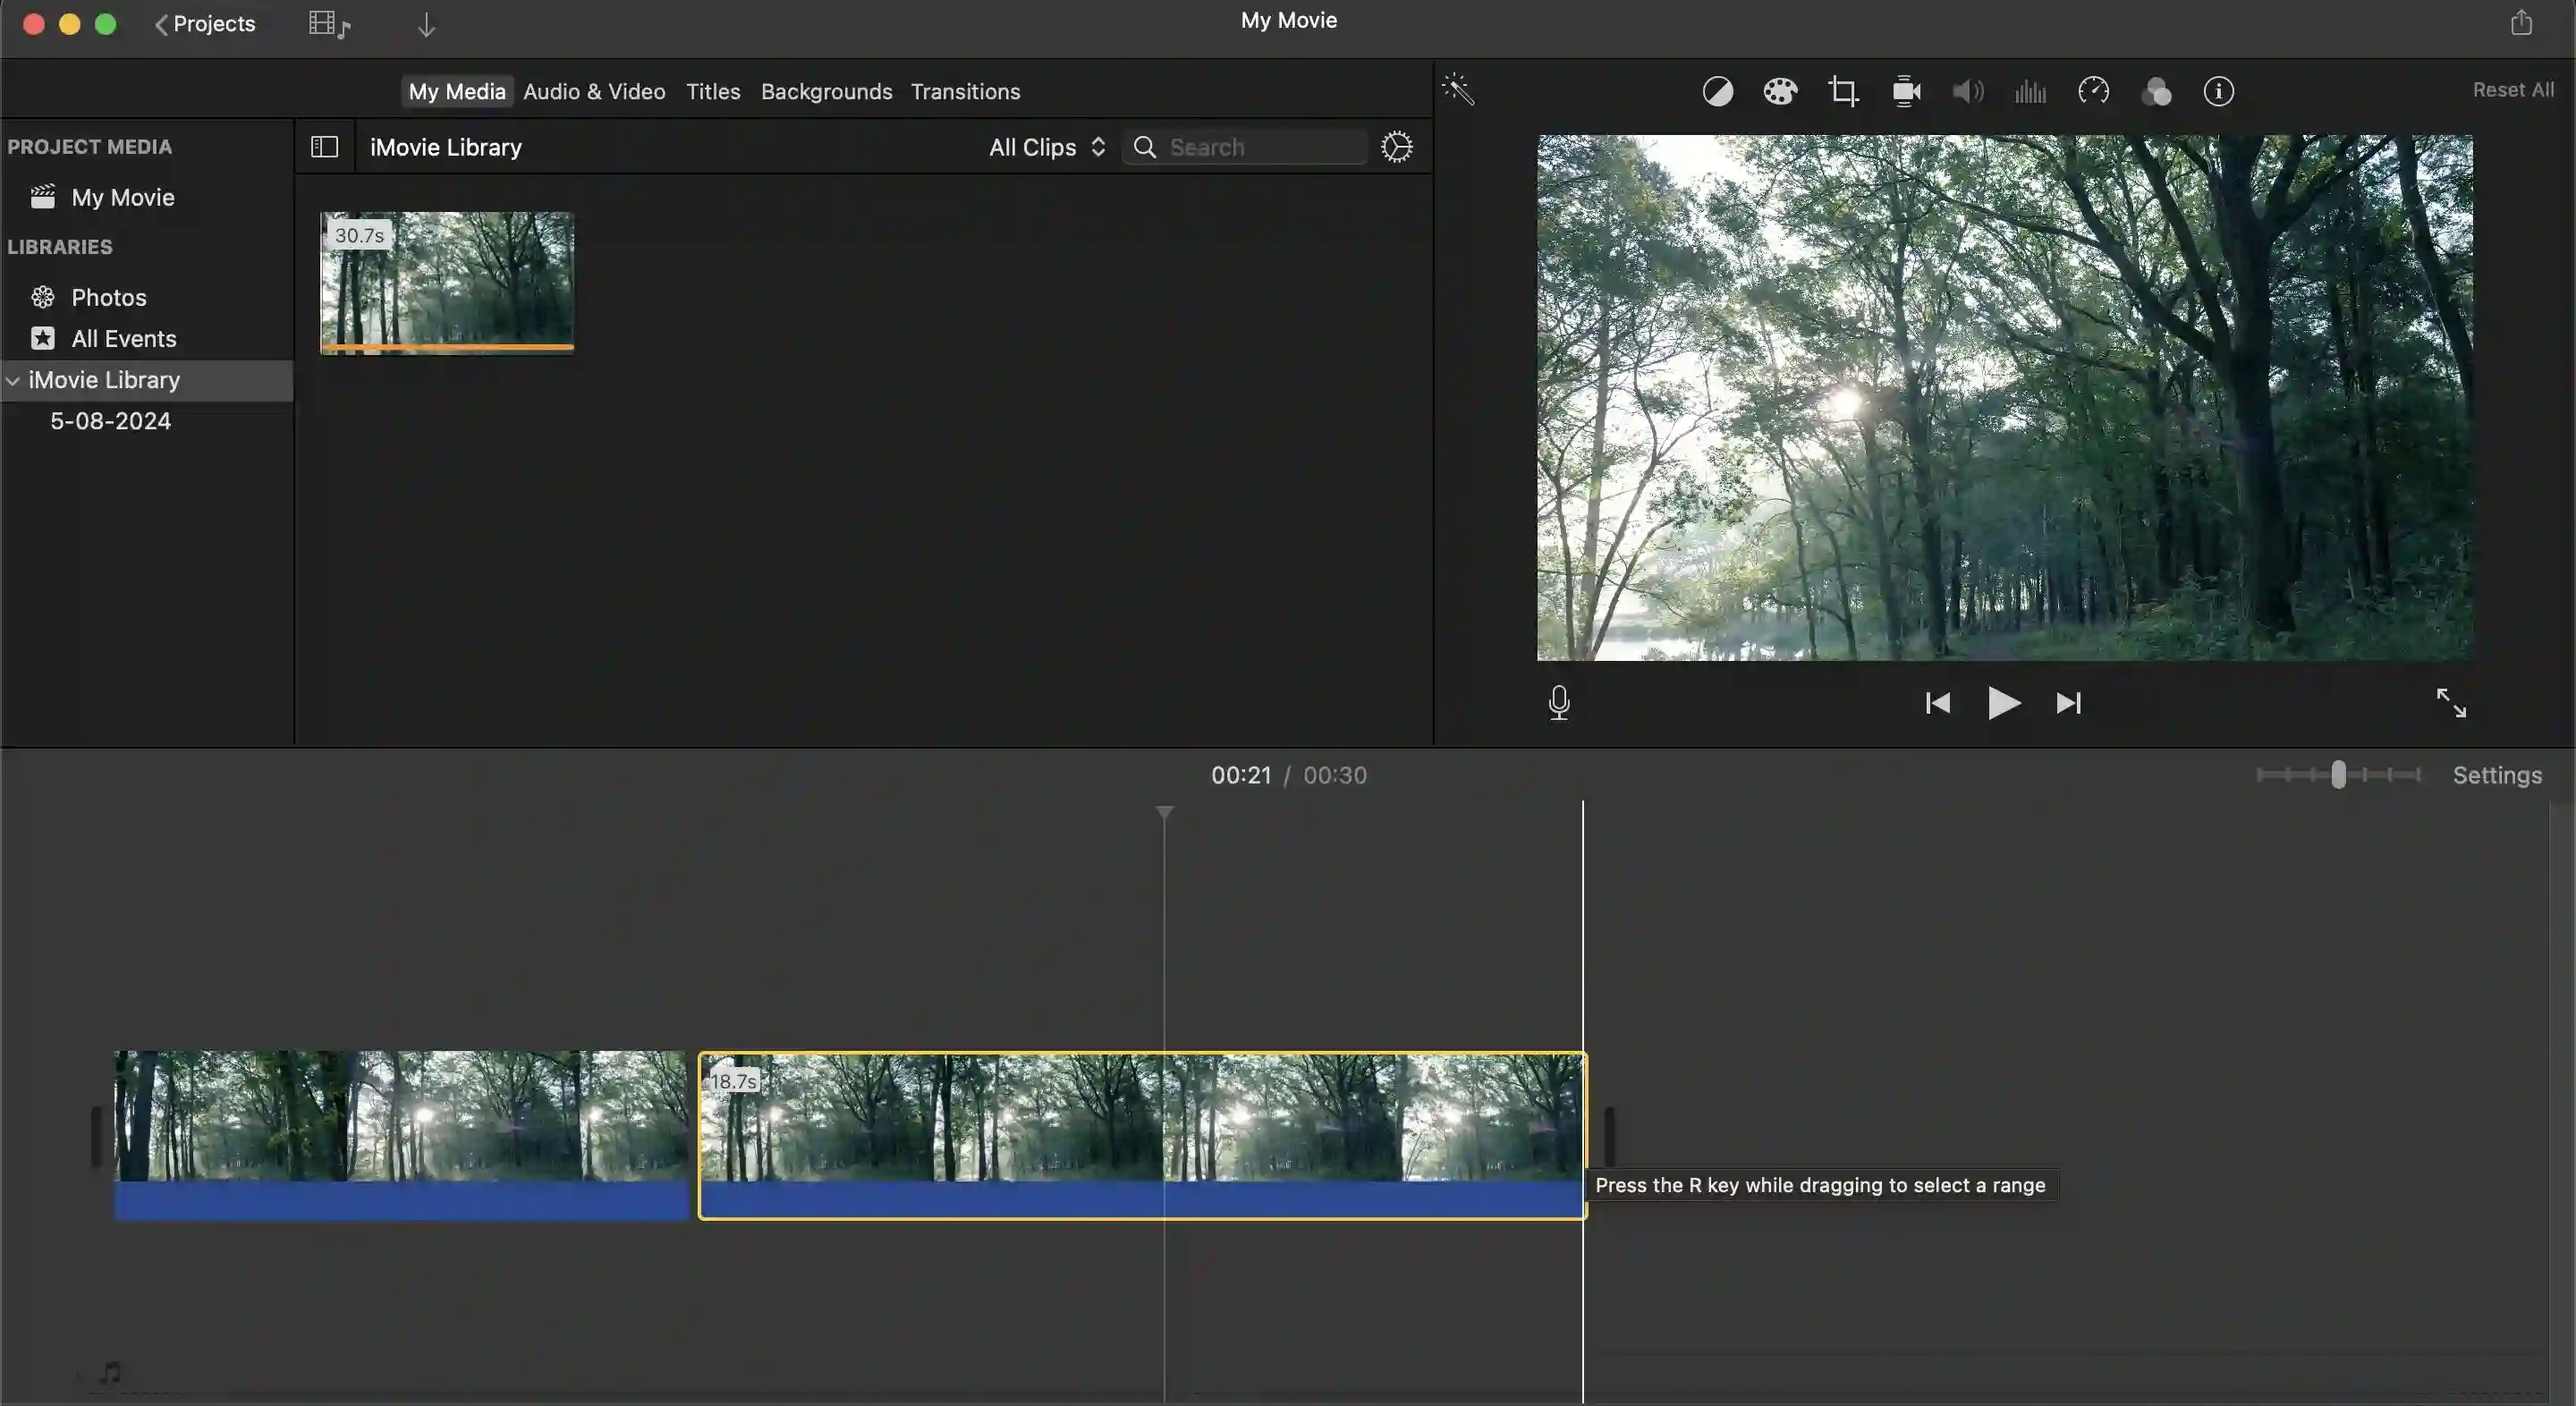
Step 6: To add B-rolls, drag the imported B-roll footage into the timeline, placing it above the main video footage. Position it at the exact point in the timeline where you want it to appear.
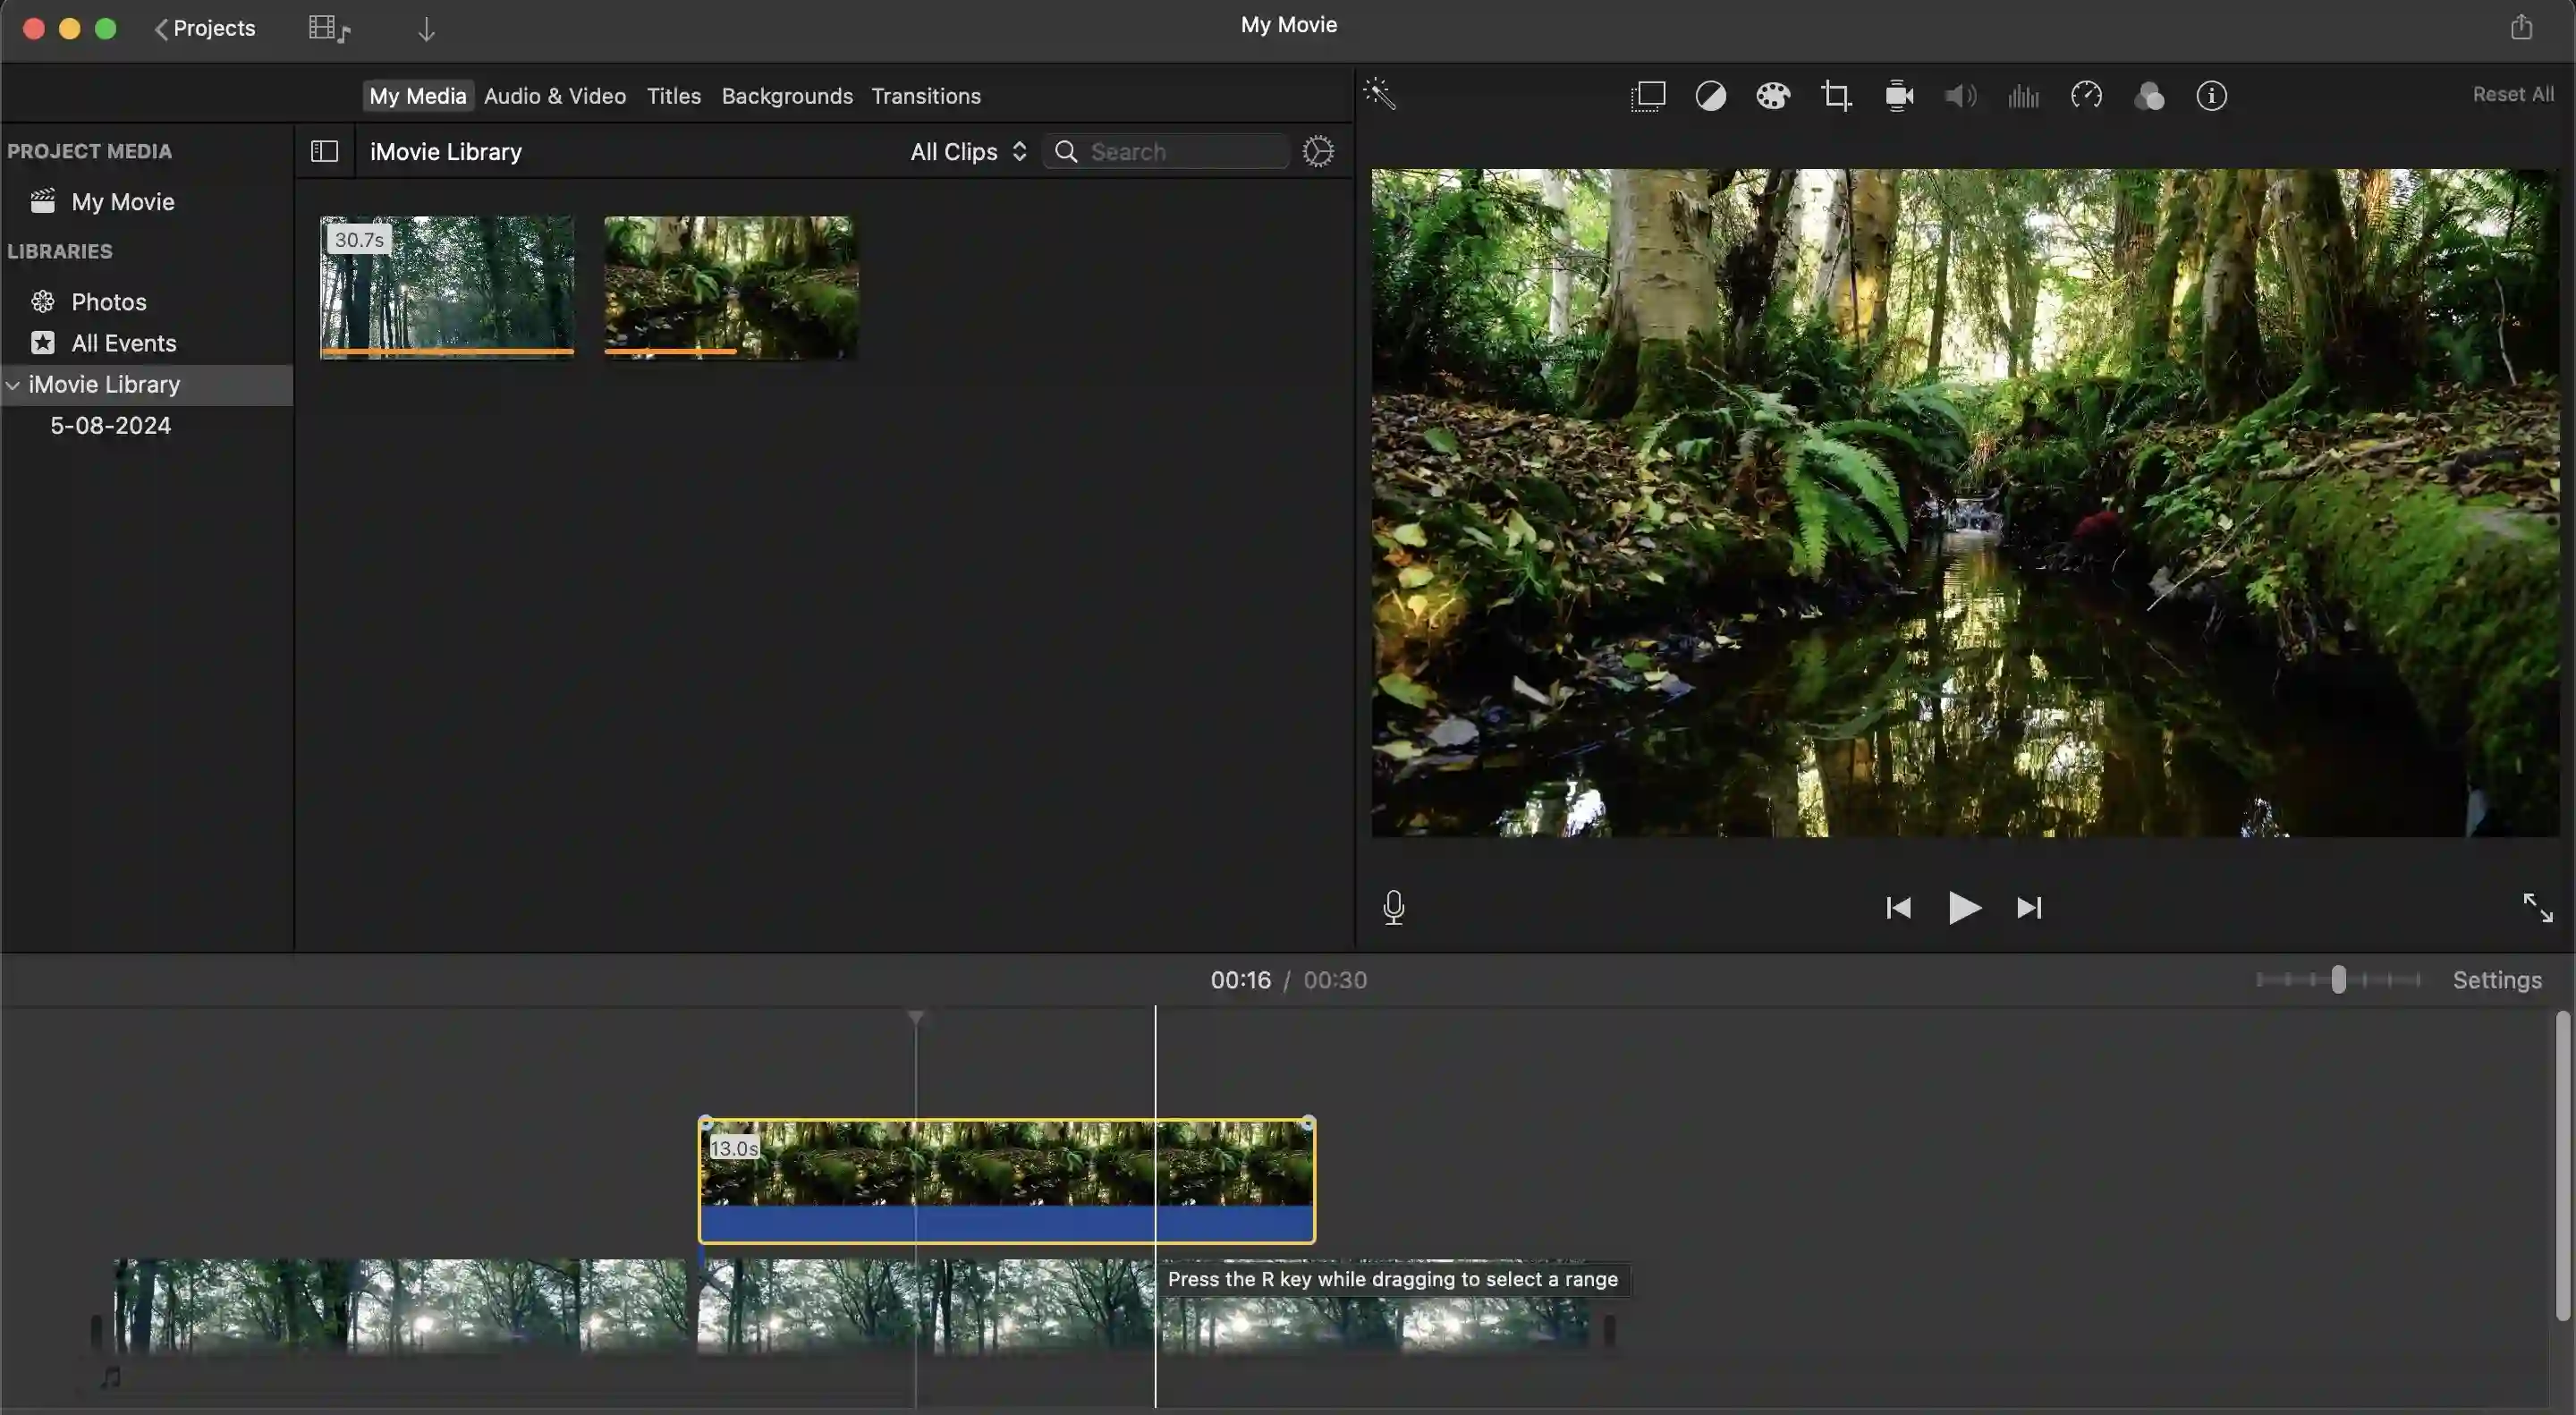
Step 7: To add titles, click the “Titles” button to access the Titles panel. Then drag the title to the desired portion in the timeline. Adjust the duration and placement of the title as needed.
Step 8: For transitions, head to the “Transitions” tab at the top and choose your preferred transition. Then drag it between the two clips in the timeline where you want the transition to be.
Step 9: If you want to add music or sound effects, head to the “Audio & Video” tab above. There you’ll find plenty of stock music and sound effects to select from.
If you want to add your music from your desktop, click File>Import Media to browse and select your files. These imported files will appear in the “My Media” tab. Drag the audio files from this tab to where you want to place them in the timeline.
How to edit a video on Android or iPhone with CapCut
CapCut is developed by ByteDance, the parent company of TikTok. It’s known for its user-friendly interface and comprehensive editing features.
Here’s how to edit a video using the software:
Step 1: Download and install CapCut on the Play Store or the App Store
Step 2: Open the app then click on “New Project.” Select the video clips you want to add from your device’s gallery and tap “Add.”
Step 3: You should now be in the editing workspace. To split the video, click “Edit” at the bottom and then click “Split.”
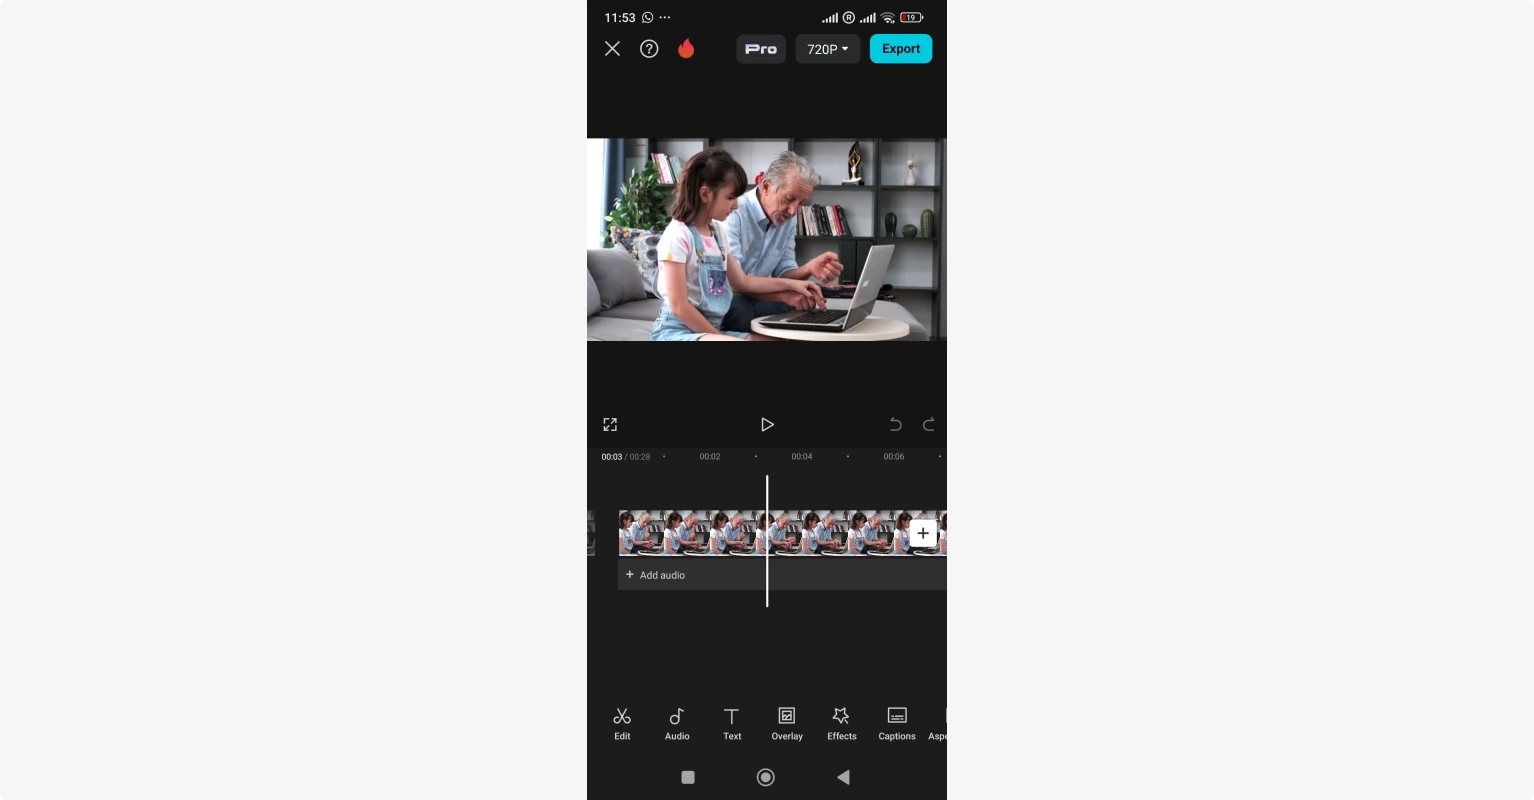
Step 4: To trim the video, click on the clip in the timeline and drag the ends.
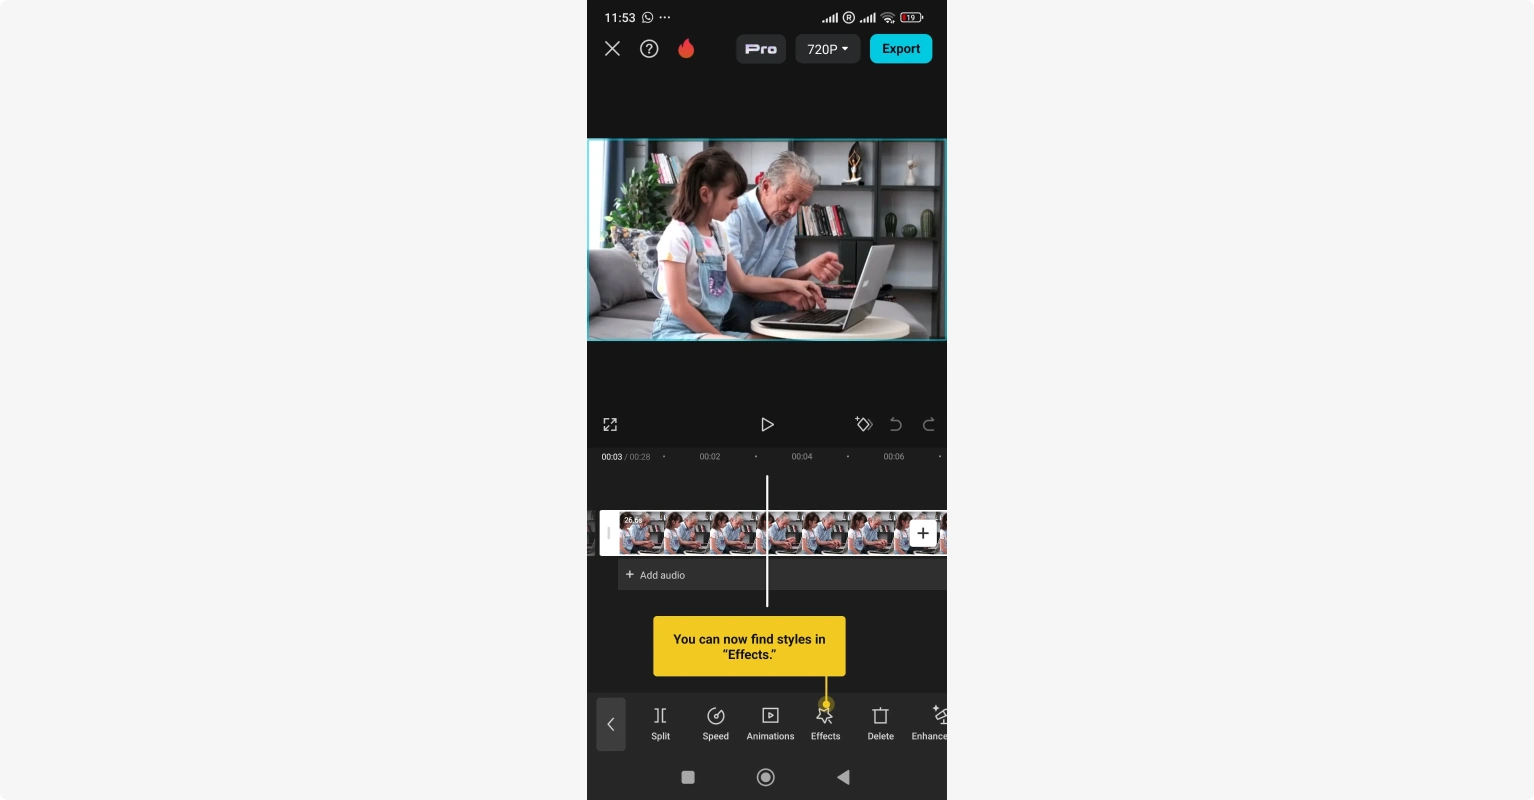
Step 5: To add transitions, click the white icon with a small vertical line between the clips. This opens the transition menu.
Step 6: Tap the Audio option below to add music and sound effects from CapCut’s library or from your own collection.
Step 7: Add text, stickers, effects, and filters by navigating to their respective tabs at the bottom.
How to edit a video for social media
The process for editing video for social media will look different depending on the device and platform you’re working on. But here are some basic yet important pointers to keep in mind:
- Choose the right aspect ratio: Adapt your video’s aspect ratio to fit the platform you’re sharing it on. For instance, the aspect ratio for Instagram Stories or Reels is 9:16. For YouTube, it is 16:9.
- Keep videos short and engaging: People on social media suffer from short attention spans. For the highest engagement rates, keep videos between 30 seconds and 2 minutes in length.
- Add captions and subtitles: This is to make your videos accessible to a wider audience, including those with hearing disabilities. Turning on captions also helps those watching videos with the sound off.
- Choose relevant music: Choose music that complements the mood and tone of your video (make sure it isn’t distracting or overwhelming though).
- Give a clear call to action: If your video promotes a product or service, give a clear call to action (e.g. visit a website, sign up for a newsletter).
- Eye-catching visuals: Use bold graphics, bright colors, and high-contrast visuals to grab users’ attention.
- Use text overlays and graphics: Add text overlays and graphics to provide context, highlight key information, and brand your content.
- Edit for pacing: Keep your video moving at a fast pace to keep viewers engaged. Cut between shots quickly and use transitions for a seamless flow.
How to edit videos for YouTube
To edit videos for YouTube using YouTube Studio, follow these step-by-step guidelines.
Step 1: Log into your YouTube account. Click on your profile picture in the top right corner and select “YouTube Studio” from the dropdown menu.
Step 2: Click on the “Create” button at the top right-hand side. Then select “Upload videos.” Then drag and drop your video file or select it from your computer.
Step 3: Enter all the necessary details, such as title, description, thumbnails, etc. In the following page, (Video Elements), you can add subtitles or info cards.
Step 4: Finally, you’ll see the Visibility page. Here you can choose to make your video Private, Unlisted, or Public. You can also select a date and time to make your video public. When you’re done, press “Save.”
Step 5: Once your video is uploaded, you can begin editing. Back in your dashboard, navigate to the content tab and click the thumbnail of the video you’d like to edit.
Step 6: Go to “Editor” on the left-hand side, and click “Get Started” in the middle. Here you can trim, cut, blur, and add audio.
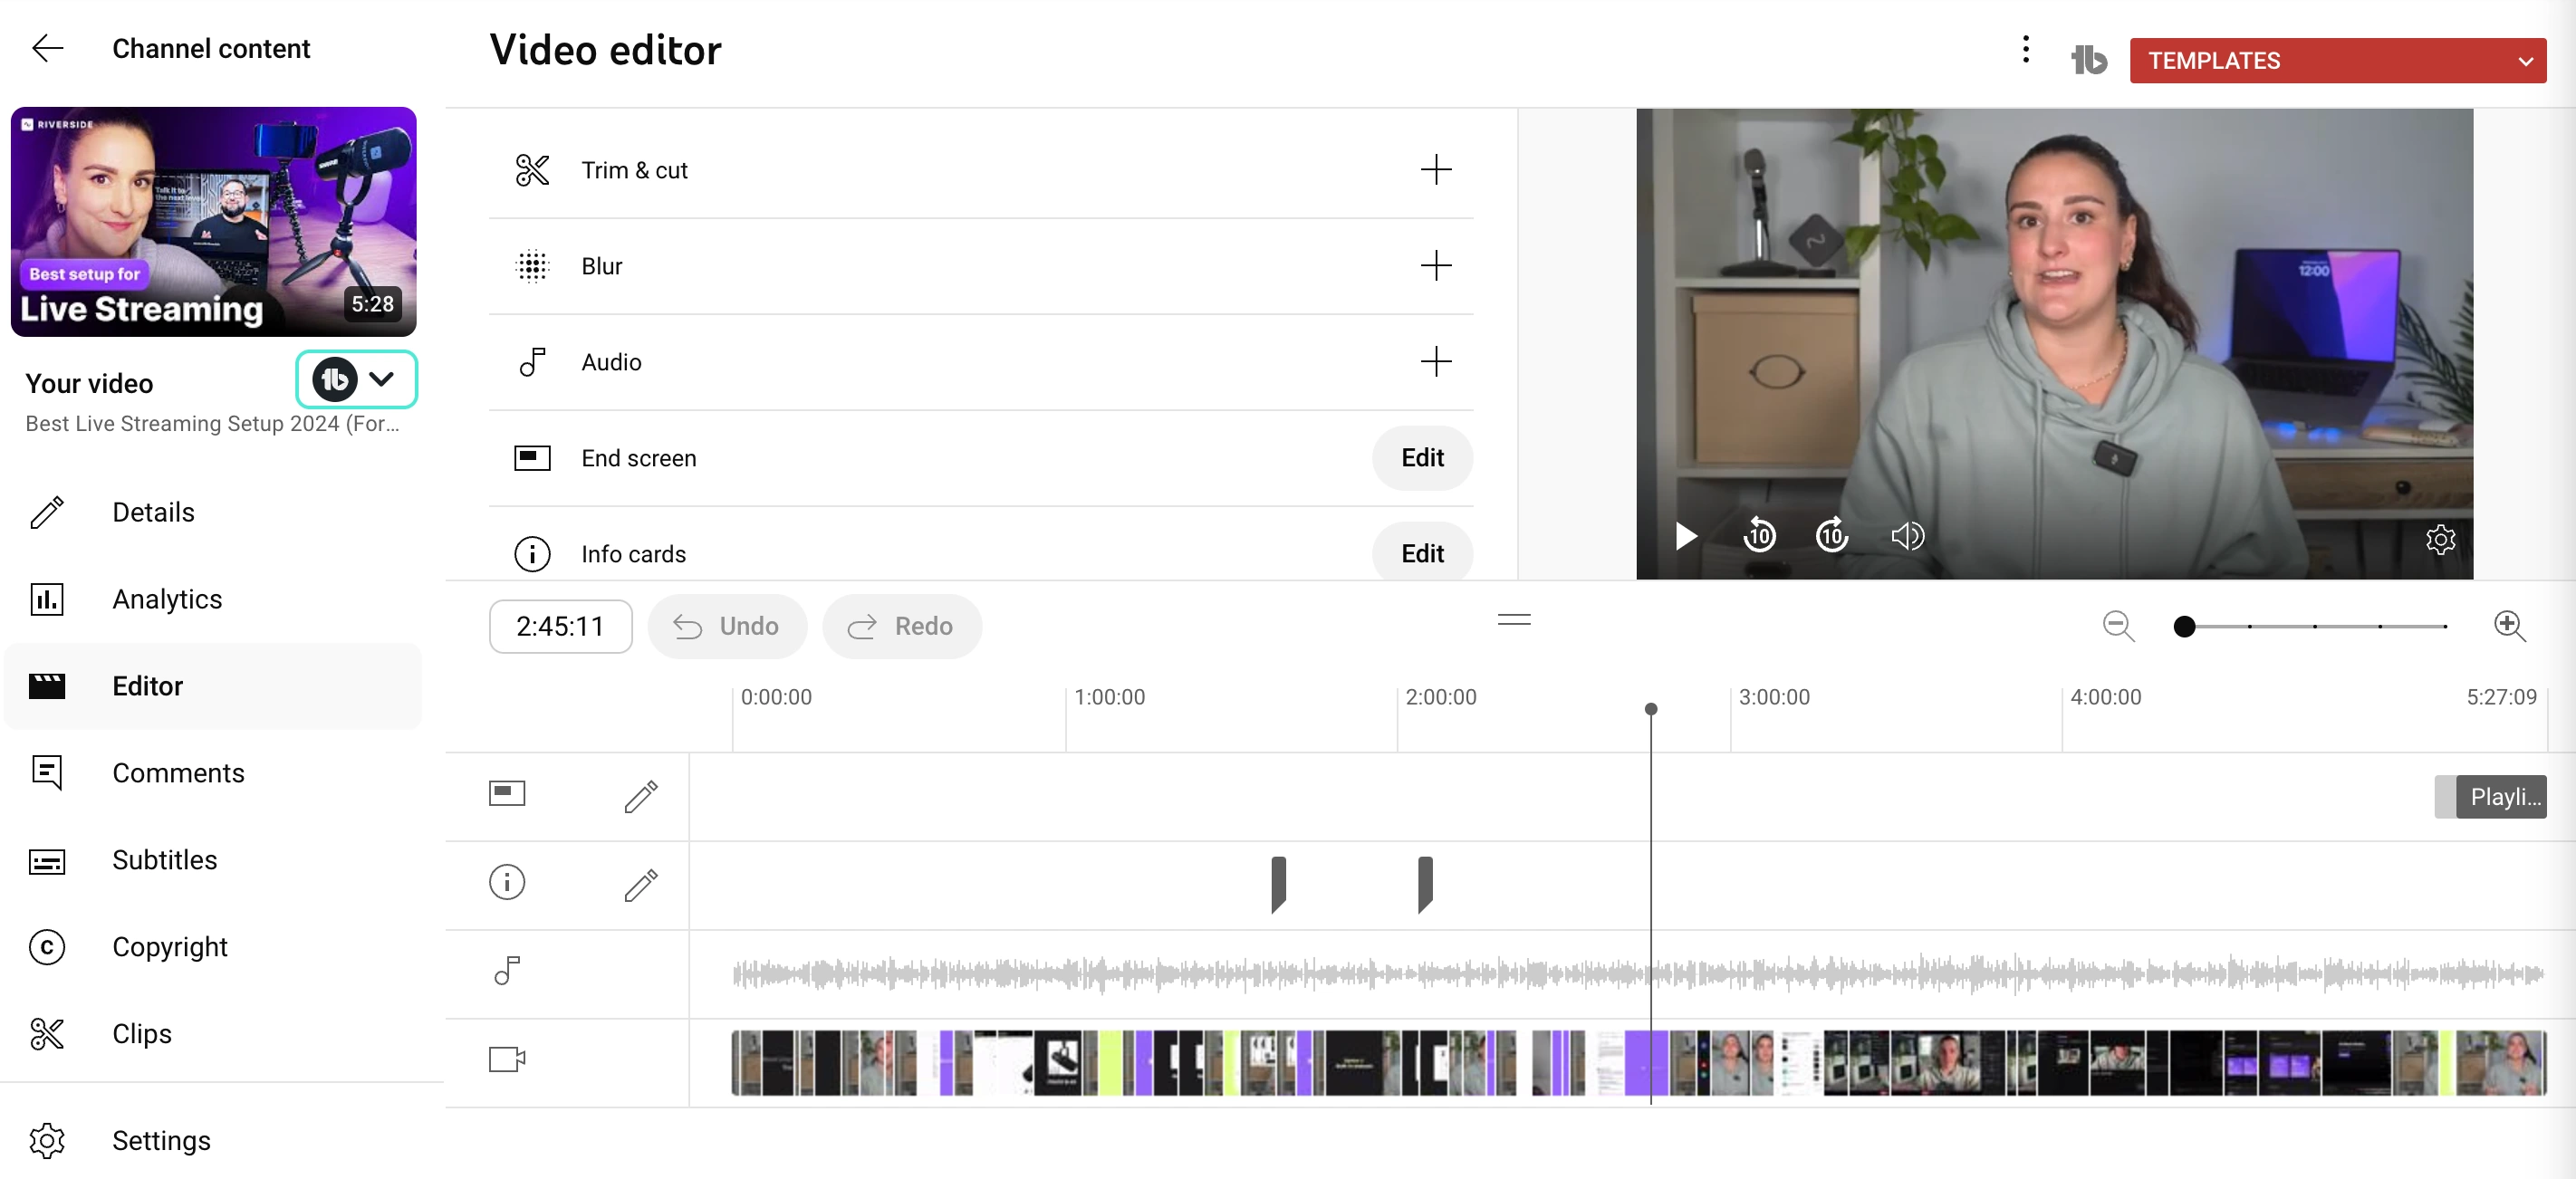
For more details on the above, visit our in-depth article on how to edit YouTube videos.
How to edit videos on Instagram
To edit videos on Instagram, follow these step-by-step guidelines.
Step 1: Install the Instagram app. Once done, open the app, and press the “Profile” button at the bottom right-hand side.
Step 2: Now click the plus (+) icon at the bottom of the page. Choose what type of content you'd like to create.
Step 3: You can then upload your own video or record something new. The click "Edit video".
Step 4: Based on the content you're creating, you'll have different editing options.
In the video post or reel editor you'll see options in the toolbox to add:
- Audio or music
- Text
- Captions
- Voiceovers
- Filters
Among other tools.
You'll also be able to adjust volume, trim and cut your video.
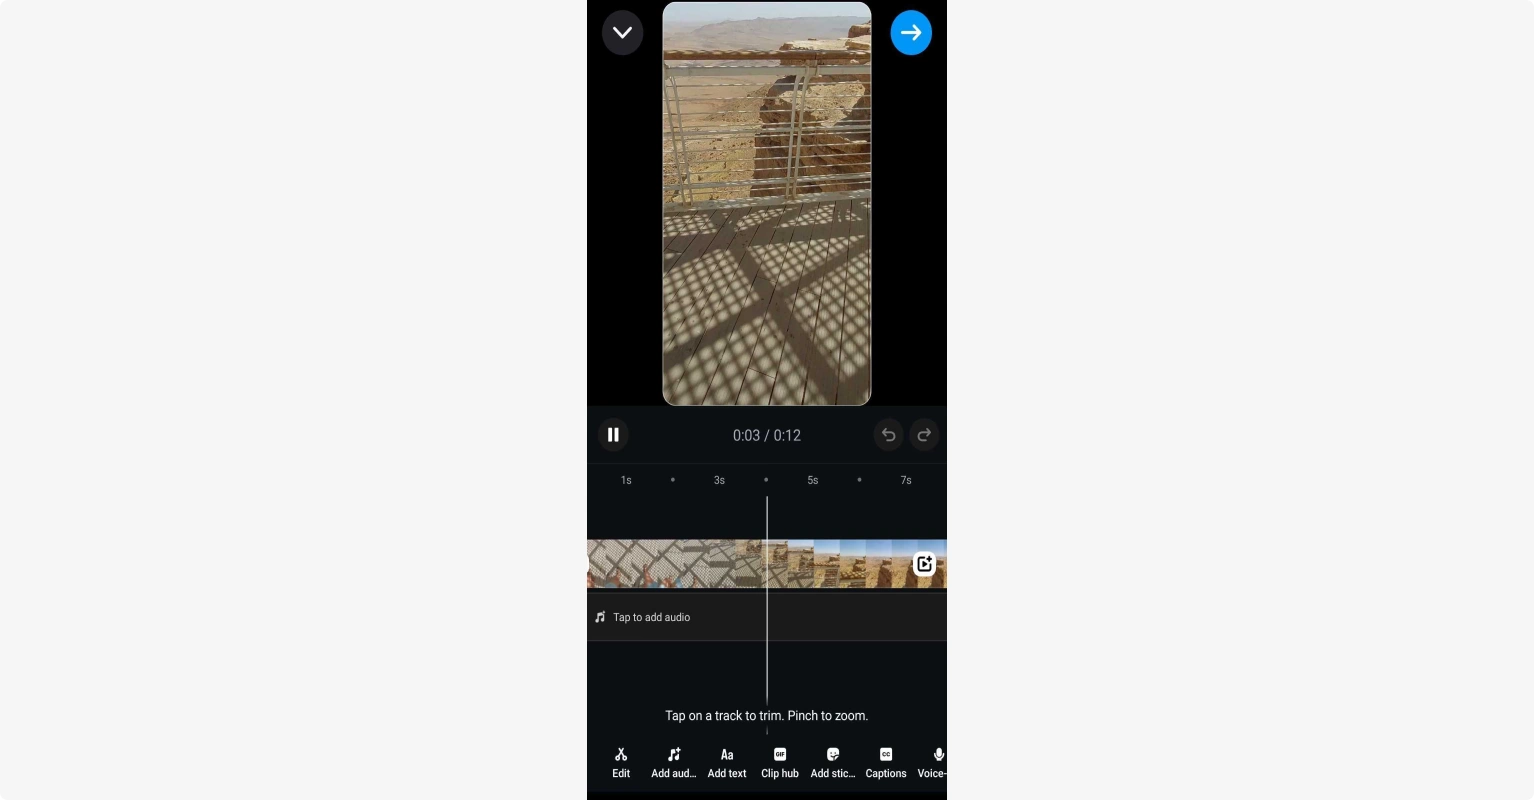
If you're creating a video story, you'll have less editing capabilities but you can still add music, captions, filters and stickers. The main difference is that this will be from a bar at the top, or by bringing up the search menu with a swipe going up on your screen.
For more details check out our article on how to make Instagram reels.
How to edit videos on TikTok
To edit videos on TikTok, follow these step-by-step guidelines.
Step 1: Open the TikTok App. Tap the (+) button at the bottom of the screen to start creating a new video.
Step 2: On the following screen, you can choose the speed of the video, add beauty effects, and add filters. Once you’ve selected the right settings, hit “Record.” (you can even add previously recorded videos by clicking the “Upload” button.)
Step 3: Once you’re done recording, a few editing options will appear. To trim the video, tap “Adjust Clips” to trim unwanted parts.
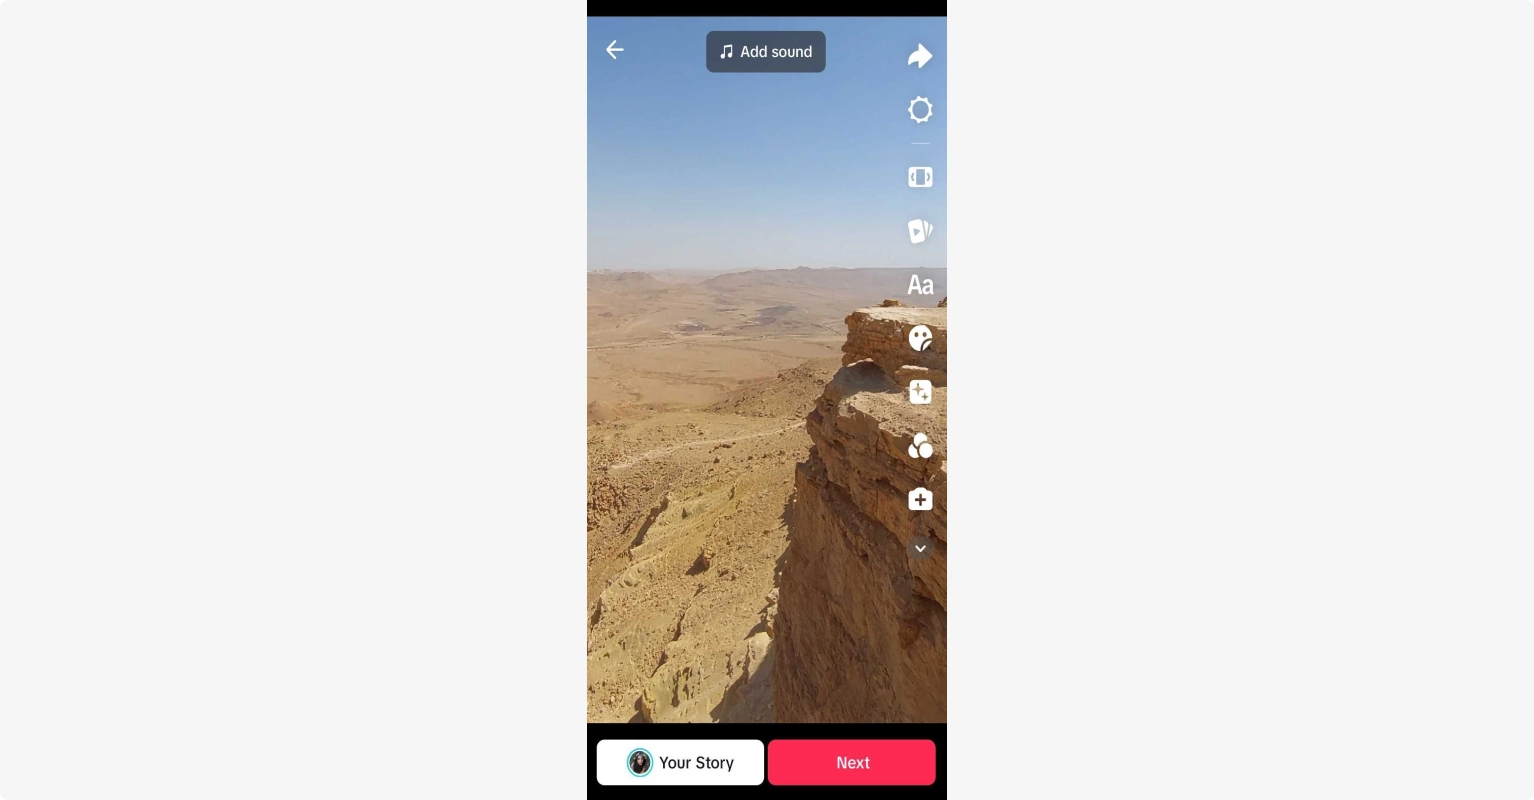
Use the “Text” tool to insert titles and captions. Customize the font, color, and position as needed. The same goes for stickers.
Select “Effects” to access transitions and other visual effects options.
For more details, check out our in-depth article on how to make a TikTok video.
5 Beginner tips for editing videos
We've go a full guide of video editing tips for beginners. But here are some to get you started:
Watch tutorials
Take advantage of the numerous tutorials available online. YouTube has plenty of excellent tutorials for free. You can also get affordable video editing courses on Udemy.
Learn keyboard shortcuts
Familiarize yourself with keyboard shortcuts for your chosen software. This will help you to significantly speed up your editing process.
Experiment and have fun
Don’t be afraid to play around with the editing software. Try new things, and make mistakes. Video editing is a process. It’s OK to learn as you go!
Use simple transitions
Transitions should be smooth and not distract from the content. Simple cuts or fades often work best.
Cut, cut, cut!
Cut out any unnecessary footage to keep your video concise and engaging.
Bonus: Resources on How to Edit Videos
Here are our favorite resources that’ll teach you how to edit videos using various software:
- Riverside YouTube channel and blog
- Collin’s Complete CapCut collection
- iMovie tutorial
- Clipchamp tutorial series
- DaVinci Resolve tutorial (free tutorial of one of the most popular professional editing software)
You can also check out list of the best video editing courses!
FAQs on how to edit videos
Still have questions about recording and editing videos? Here are our answers to a few FAQs!
How do I start editing videos?
You can start editing videos by using software that’s free and simple. Later, you can progress to more advanced and paid software.
There are lots of free video editors, including CapCut, iMovie, DaVinci Resolve, and Riverside (most editing features available in the free version).
Is editing videos easy?
Editing videos can be both easy and challenging, depending on several factors. These factors include the complexity of the project, the software being used, and the editor’s experience level.
How can you trim videos on an iPhone?
To trim videos on an iPhone, you can use the built-in Photos app. Here are the steps to trim videos using the Photos app:
- Launch the Photos app on your iPhone.
- Select the video you want to trim
- Tap “Edit” on the top right corner of the screen
- At the bottom of the screen, you’ll see a timeline with handles on either end. Drag these handles to set the start and end points of your video
- Once satisfied, tap “Done.” You can either overwrite the original video or save the video as a new file, keeping the original video intact.


.webp)
.webp)
.webp)


